Campin' Targets
Documentation
Everything you need to scan a horizon and plan a session. If something here is wrong or missing, let me know at douglas.barnum@gmail.com.
Getting started
Campin' Targets has two main jobs: capture your horizon once at a site, then plan around it every time you come back. The first time you open the app you'll see two tabs — Scan and Plan. There's nothing to set up; the app asks for camera and location permission the first time it needs them.
Recommended first run: open Scan, tap the viewfinder icon, walk through a full 360° pan of the horizon at your campsite. Tap Done — you're now ready to plan.
Scanning your horizon
Hold the phone in portrait with the camera roughly level. A center reticle helps you keep the camera aimed at the horizon line. As you pan, the app:
- Uses ARKit to know where the camera is pointing, accurate to better than a degree.
- Runs a Core ML semantic-segmentation model on every tenth camera frame to classify pixels as sky or obstruction.
- Records the highest obstruction it sees in each 1° azimuth bin, and saves a thumbnail of the scene for every 5° of azimuth.
Yellow dots accumulate on screen showing the horizon profile. Pan slowly — about as fast as you'd sweep your eye across a landscape. You'll see the coverage indicator climb toward 360° as you go.
When the dots look complete, tap Done. The scan is saved to your library along with its location (from GPS) so it can be reused later or synced to your Mac.
Conditions: the ML classifier works well in overcast, partly-cloudy, sunset, and twilight skies. The one known weak spot is the sun very close to a rooftop or treeline at sunrise / sunset — you may see scattered dots that the editor cleans up easily.
Editing a scan
Open the horizons list, swipe left on a scan, tap Edit. You'll see a single canvas with the thumbnails laid out by azimuth and the yellow elevation dots overlaid directly on the photos.
- Pinch to zoom (0.5× to 6×). Two-finger drag to pan in both axes.
- Drag a dot up or down to nudge that point's elevation. The blue interpolated profile updates live.
- Long-press a dot to delete it. The profile interpolates over the gap.
- Reset reverts the entire scan to the originally captured points.
- Save commits the edits and pops back to the list.
A clean scan typically needs a couple of minutes of work — fix any dots floating in clear sky (drag them down to the actual horizon), delete obvious outliers near the sun or bright clouds.
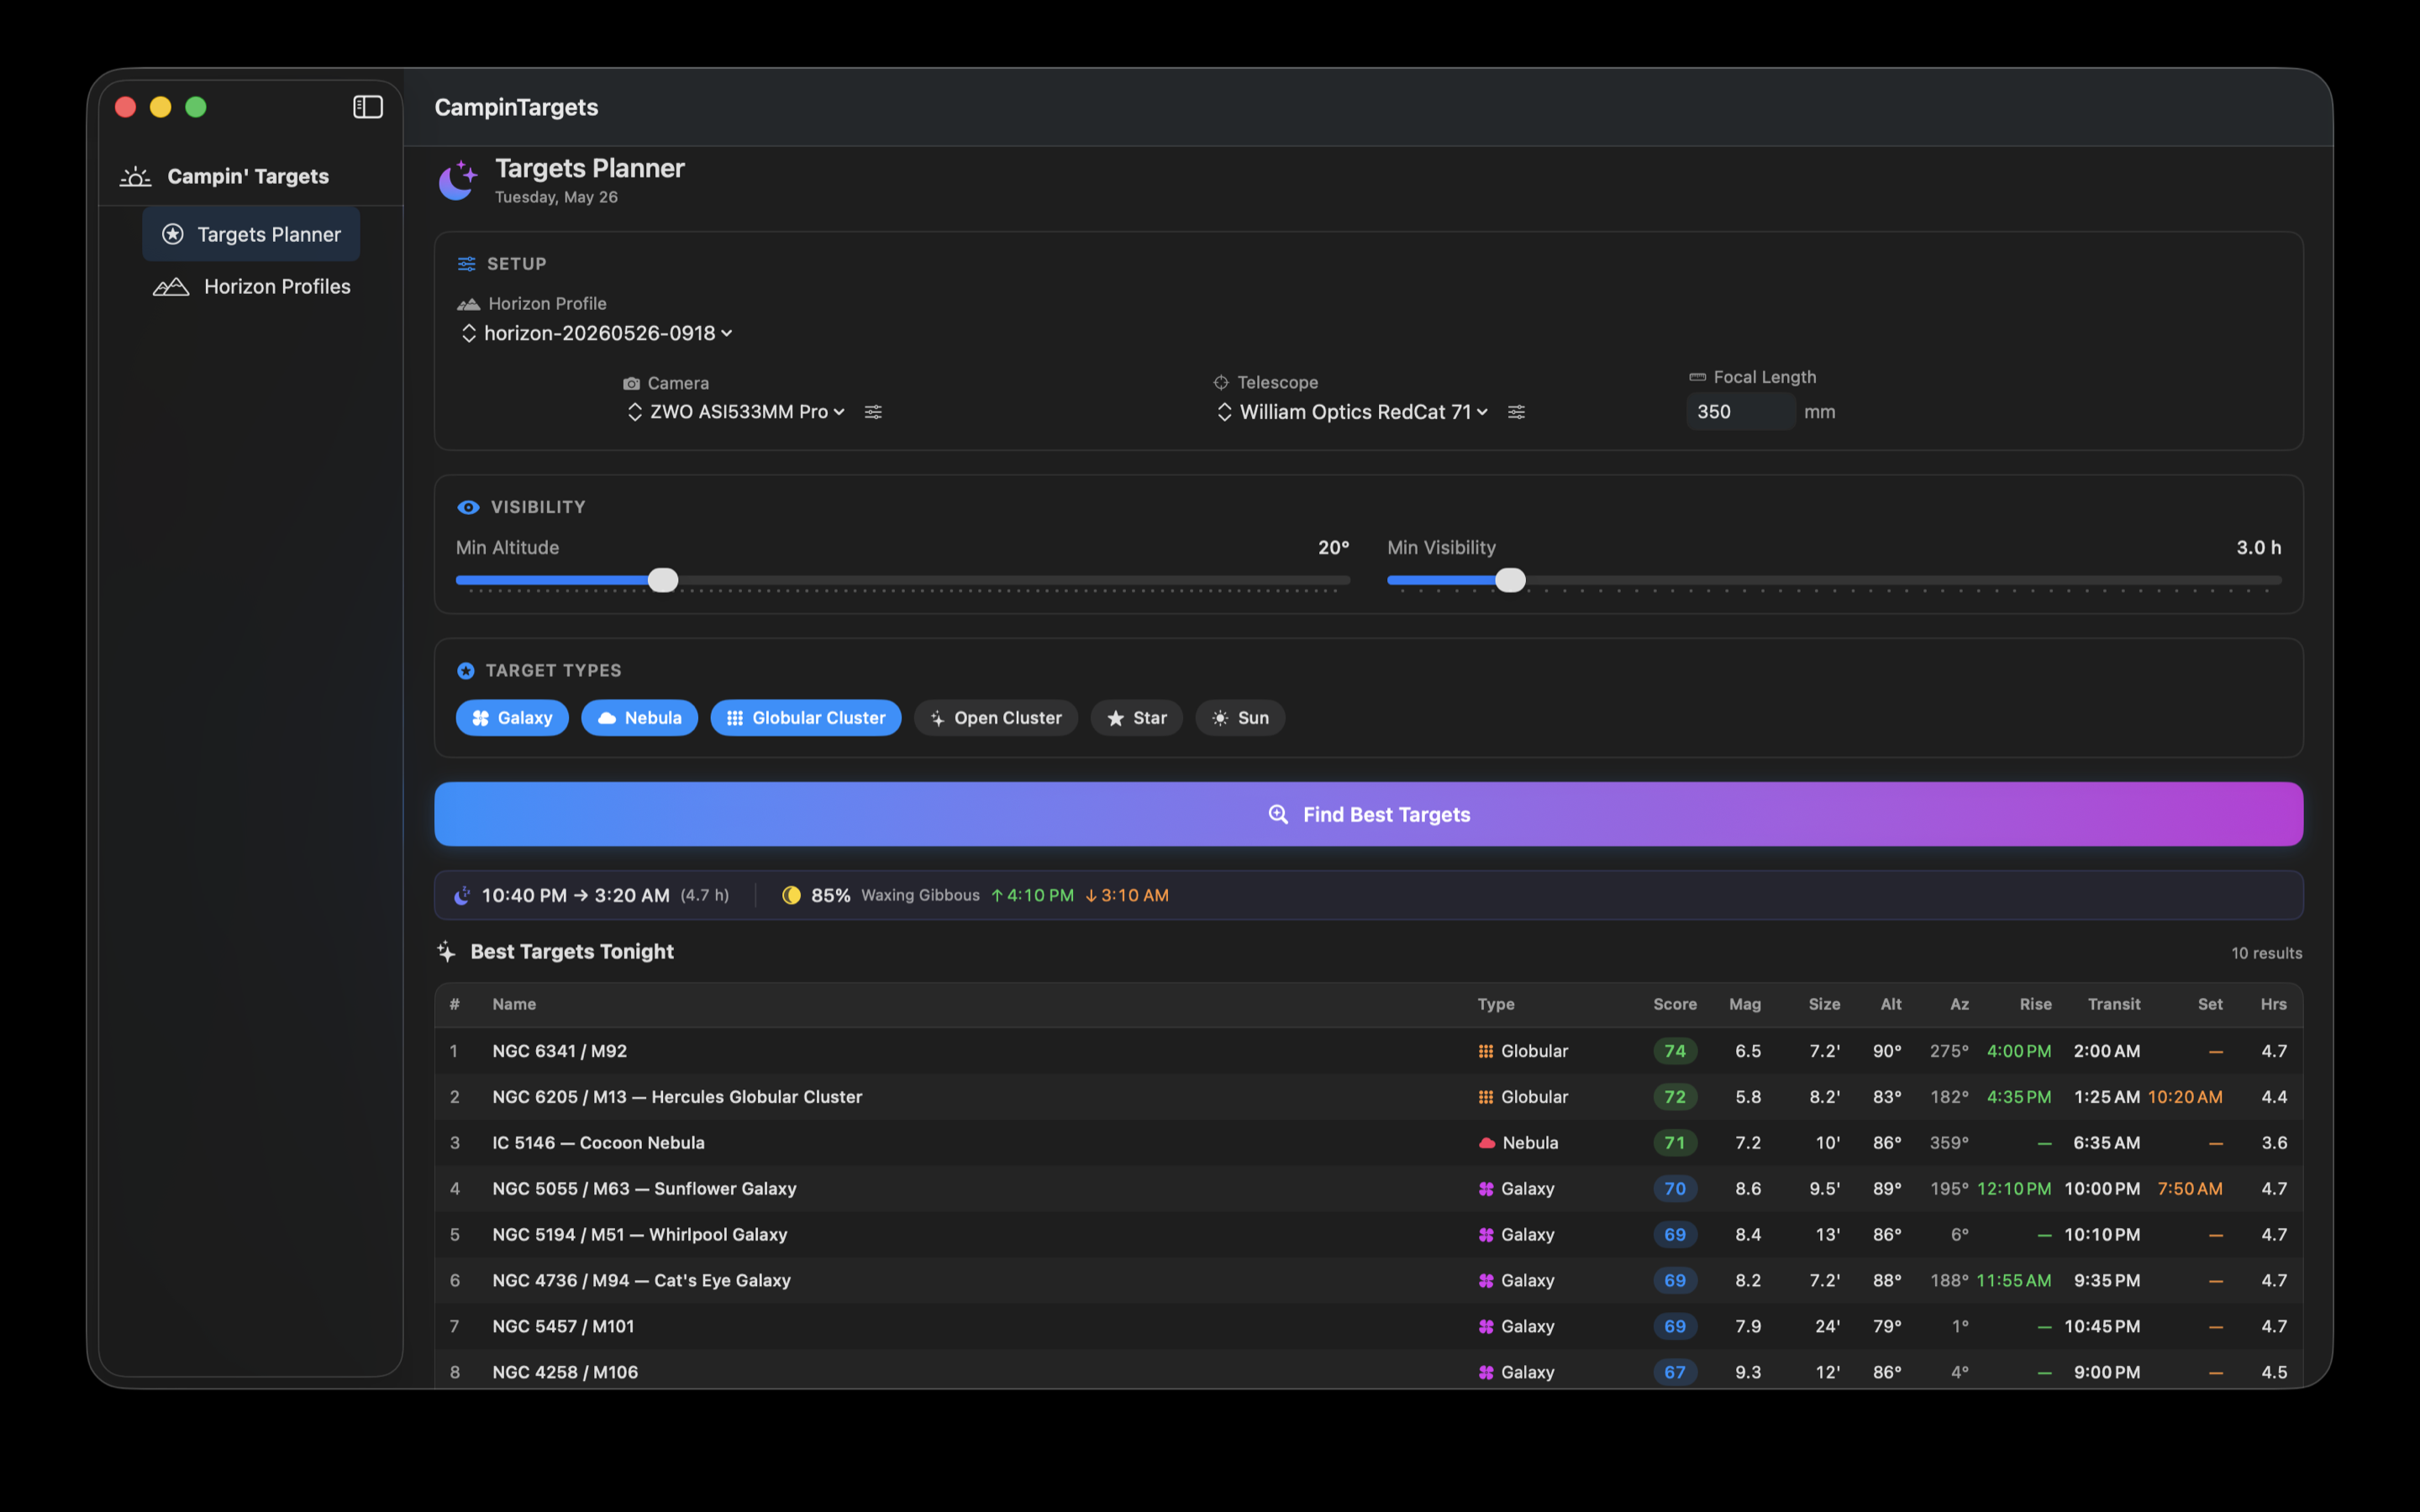
Planning a session
On the Plan tab, pick the horizon you want to plan against, choose a camera, and choose a telescope (or just a focal length). Drag the sliders to set your minimum altitude and minimum visibility hours. Tap Find Best Targets.
The planner walks the full NGC catalog (about 14,000 objects, filtered down to imaging-worthy targets at a magnitude and size threshold) and scores each one against:
- How high it rises above your real horizon tonight.
- How long it's visible during astronomical darkness.
- How well it fits your camera's field of view.
- Its brightness.
Results are ranked. Tap any target to open a detail screen with rise / transit / set times, an altitude curve showing both your horizon and the dark-window, and a frame preview that overlays the target's apparent size on your camera FOV.
Include the Sun by toggling the Sun chip in target types — useful for daytime solar imaging.
Sharing & export
Any saved horizon can be exported and shared. From the horizons list, tap the share action on the scan you want to send. The app produces two files:
-
<name>.hrz— the Stellarium polygonal-horizon file (azimuth + elevation pairs, with your captured location embedded as metadata). -
<name>_landscape.ini— the Stellarium landscape descriptor that references the.hrzand carries your latitude, longitude, and elevation.
The standard iOS share sheet opens — AirDrop them to your own Mac for use in the Campin' Targets Mac app, AirDrop them to a friend, or save them to Files / Mail / Messages.
On the receiving side
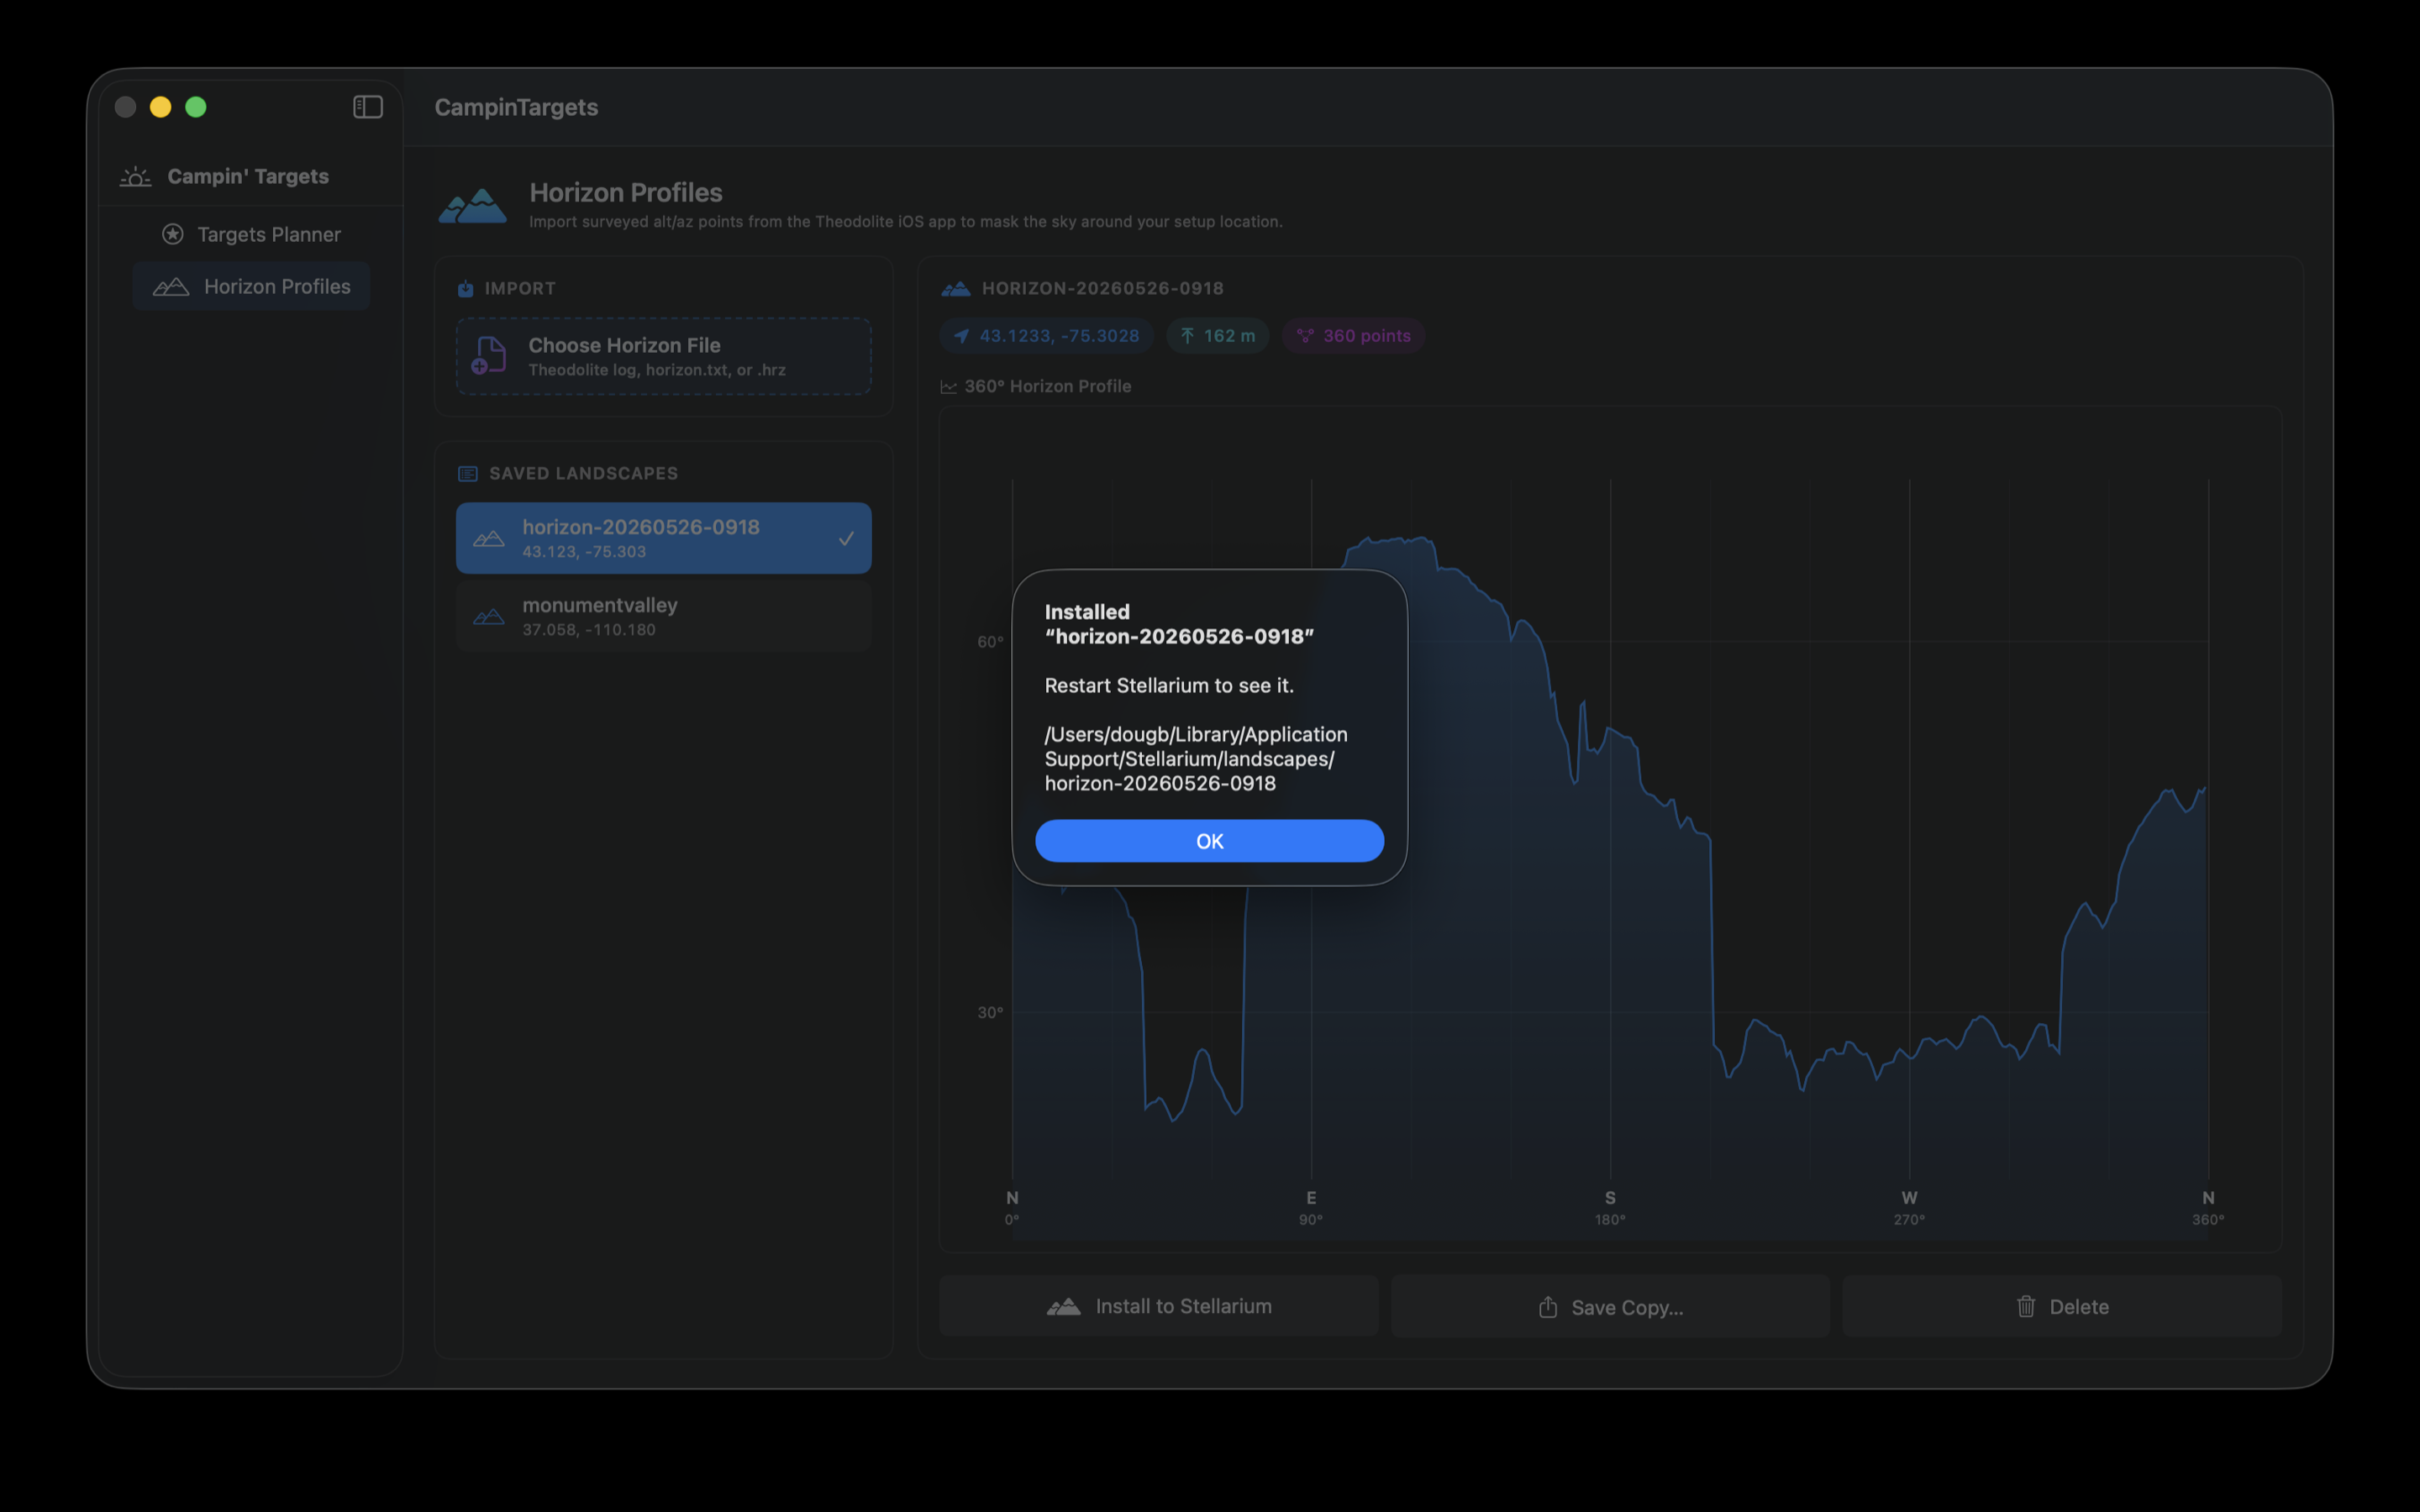
With the Campin' Targets Mac app: drop the
.hrz into Horizon Profiles, click
Install to Stellarium, and you're done.
Without the Mac app: you can still install the horizon by hand in Stellarium. The bundle just automates the steps below.
-
Open Finder and navigate to
~/Library/Application Support/Stellarium/landscapes/(or the equivalent on your platform). Create a new subfolder named after your horizon, e.g.backyard/. -
Move the two received files into that folder. Rename
<name>.hrztohorizon.txtand<name>_landscape.initolandscape.ini— Stellarium expects those exact filenames inside each landscape directory. - Restart Stellarium. The new landscape appears under Sky and viewing options → Landscape.
The Mac bundle exists to skip the rename / restart shuffle, but nothing in the format is locked behind it. If you scan a horizon at a friend's astrophotography site, you can hand them the two files and they'll have your exact horizon profile in Stellarium a minute later.
Stellarium (Mac)
On the Mac app, captured horizons can be pushed into Stellarium as a landscape so you can plan visually in Stellarium's sky view.
- Open a horizon in the Horizon Profiles section.
- Click Install to Stellarium.
-
The first time, a file picker opens — point it at Stellarium's
landscapesfolder (usually~/Library/Application Support/Stellarium/landscapes). The app remembers your choice via a security-scoped bookmark. - Subsequent installs are silent. Restart Stellarium and select the new landscape from Sky and viewing options → Landscape.
If you'd rather not install the regular Stellarium build (e.g. you
only have the App Store version, which is sandboxed and can't be
written to from outside its container), you can still export the
horizon as a horizon.txt file and import it manually.
iCloud sync
Horizons, cameras, and telescopes sync between your iPhone and Mac through Apple's CloudKit using your own iCloud account. There's no login or setup required beyond being signed into iCloud with iCloud Drive enabled.
Thumbnails (the filmstrip imagery used by the scan editor) are not synced in v1 — they stay on the device that captured them. If you edit a horizon on the Mac that was scanned on iPhone, the editor falls back to "no imagery" and you can still adjust points blind.
FAQ
Have a question that isn't here? Email douglas.barnum@gmail.com and I'll add it.
What does the "ML model unavailable" banner mean?
The Core ML model couldn't load. The app silently falls back to a simpler luminance-threshold classifier and exposes a sensitivity slider so you can dial it in. The scan will still complete; results will be less robust to bright clouds and unusual lighting. Quitting and reopening the app usually restores the ML model.
My scan missed a section of horizon. How do I fix it?
Pan more slowly through the missed range and the bins fill in. You can also re-open the scan in the editor and adjust elevation manually by dragging the nearby dots, though the editor doesn't currently add new bins from scratch.
Why does the editor say "No imagery for this scan"?
Older scans captured before the editor was added don't have thumbnails. Re-scan to get an editable filmstrip. Scans made on another device also won't have local imagery — thumbnails don't sync via iCloud in this version.
Stellarium doesn't show my new landscape. What's wrong?
Confirm you picked the right landscapes folder (it
should contain at least one subfolder with a
landscape.ini file). The Mac app's installer warns you
if the folder doesn't look right. After installing, restart
Stellarium and select the landscape from Sky and viewing
options → Landscape.
Does the app work without an internet connection?
Yes. Everything that matters runs on-device — the ML horizon classifier, the rise/transit/set calculations, and the NGC catalog are all bundled in the app. iCloud sync is the only feature that needs the network, and it's optional.
Why does my horizon scan need location permission?
Two reasons: aligning the scan to true north (so the azimuths in the saved profile mean what they say), and computing accurate rise/transit/set times for celestial targets at your specific latitude and longitude. Location is read while the app is open and never leaves the device — see the privacy policy for details.
Can I share a horizon with someone else?
Yes. Export from the horizons list and the iOS share sheet lets you AirDrop the two horizon files to any Mac (yours or a friend's), email them, save to Files, etc. The Campin' Targets Mac app installs them into Stellarium with one click; without the Mac app, the files can be placed into Stellarium's landscapes folder by hand. Full steps in Sharing & export above.